
My daughter and I devised a liner, made with PUL fabric, which goes into the can and serves to hold the diapers, keeping them from actually touching the can itself, therefore keeping it clean. When it is time to do the laundry, the liner can simply be lifted out of the can, the contents dumped into the washer, and the liner itself thrown in to be laundered as well.
Here is a photo of the can with the finished liner in it:

And here is the inside of the can, where you can see the pink PUL fabric, which is the waterproof material:

DIRECTIONS
1) Trace the lid of the can onto a single layer of the PUL fabric (this will be the piece that is used for the bottom of the liner.)

2) For the main tube, cut a piece of PUL that is 42 1/4" x 9 1/2". Sew a 1/4" seam down the short side. I found it easier to put the shiny sides together, as the fabric feeds through the machine without a problem.
3) Next, pin the shiny side of the circle to the shiny side of the tube and stitch all the way around as shown below. (try to keep the seam around 1/4" to 1/2" .... you don't have to be perfect.) Set aside this piece while you proceed to making the band for the liner.
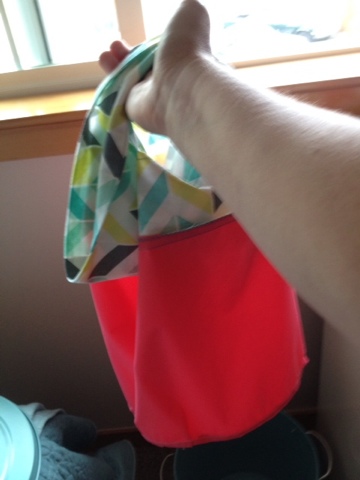
Lisa is holding up the liner, in the manner that it will be inserted into the can. The seams will be against the can when inserted. The diapers will rest against the shiny "finished" surfaces of the liner:


4) The band can be made out of most any cotton or cotton/poly fabric. We selected a fabric that went well with the turquoise bucket. Cut two pieces of band fabric, each measuring 42 1/4" x 8".
5) Fold one strip lengthwise, and press. Unfold this strip. (the photo shows both strips pressed down the middle, but it is only necessary to press one strip; all you are doing is creating a line to follow when stitching.)

6) Place the strips right sides together. With your fold line on top, place pins at the following measurements....
7", 14" 28", and 35". Start at the edge of the fabric and stitch on the folded guide to the first pin. Be sure to backtack at the beginning and end of each segment of stitching. Then leave a gap of 7". Start stitching again at the next pin which is the 14" mark; End stitching at the next pin which is the 28" mark. Once again, leave a 7" gap and start stitching at the next pin which is the 35" mark and stitch to the end. (The photo shows the fabric strips on top of each other, right sides together, and the pins placed as indicated above. You will be sewing right on top of that fold line, stopping and starting as indicated above.)

7) Now you will "open up the fabric, folding each piece back upon itself. Press. The photo shows that you will have created a band with two openings that will serve as the slots that slip over the handles of the can.

8) Now, just stitch around the openings for further reinforcement. This step is not necessary, but does finish them off nicely.

9)Press under 1/2" on both long edges of just one side of the band. These folded edges will be stitched together, forming a finished "hem" on the portion of the band which hangs over to the outside of the can. Stitch them together.

10) Stitch the short edge of the band together to form a tube shape.

11) Pin the band to the PUL piece you had previously set aside. You will be pinning the band to the shiny side of the PUL. And, be sure that the band seam is not against the shiny side. See photo. Once this seam is sewn, and the liner is inserted into the can, you will be flipping the band to the outside and the band seam will be hidden underneath the band.


12) Zig zag the seam you just sewed. This will prevent long threads from pulling out in the wash. The photo shows the zig zag stitching...the PUL is on the underneath side, but I have flipped it forward to show the stitching as it doesn't show up real well on the band fabric. (Note: the non-shiny side of the PUL does feed well through the machine).
13) Insert finished liner into can, slipping the slots of the band over the handles!
liner bag being lifted out of the can: