Monday, June 9, 2014

Cards

Just a quick post to show a few cards I have been making.
This card was cased from one I saw on Splitcoast. However, I did not own the new Work of Art set from StampinUp, so had to improvise and create some painterly swishes in Photoshop, and use them as my background. The birds are from the digital set by StampinUp called Wetlands. Sentiment was done in Photoshop. The kraft paper is embossed with the basketweave embossing folder also by SU. Bakers twine finishes these fathers day cards.


This card is for my daughter and son-in-law who recently moved into their new house. The house stamp is from Studio G (old set), PTI dotted swiss ribbon, PTI Congrats All Ways sentiment. 


These two birthday cards make use of the PTI Monthly Moments sentiment stamps. I stamped them onto PTI diecut tags (Tag Sale #9). Sailboat is from Hero Arts; the other stamps are misc. older ones.


This baby gift was commissioned by my daughter to give to her new niece. The applique is Minkee fabric. The card was very simply made. I used Rustic White paper by PTI; the stamps are Unity, from an older kit. 


This is a hostess gift for my daughter. She lives in the Pacific Northwest, so perhaps the nautical designs will be appropriate. The designs were embroidered on floursack dishtowels. The tag is cut using PTI tag sale dies. The stamp is also PTI, Friendship Jar Summer Fillers. I colored the stamped image with Copics.

Monday, March 3, 2014

Baby Shower Gift

The aden + anais muslin swaddle blankets have become really popular with parents. Back in the 70s and 80s, we did not have blankets like these! A nice feature is that they are a generous 44" x 44". Those who choose to "swaddle" their baby have lots of options with a blanket of that size. "Back in the Day", we wrapped the baby up, but today there is a whole sophisticated set of instructions for proper swaddling of the baby. I think I am glad that my baby-raising days were long ago (although I have had to learn a new thing or two for taking care of the grandbabies!)

Anyway, I needed to make a baby shower gift, and embroidered designs on two of these muslin blankets. I also made a card to go with the gift. The stork and baby are from a PTI set; the chevron paper is Crate's "Fourteen" from last year. The grass was diecut. The blankets will be packaged in a clear cellophane bag, tied with bridal tulle.


And here is one more photo, of Aden blankets embroidered for a baby gift:


Sunday, March 2, 2014

Valentine's Day....a bit late

Well, it is now March but perhaps still within the timeframe where I can post things related to Valentine's Day. This year I made cards for my grandkids and for my daughters. Also, a nice one for a friend on which I was able to make use of some new heart dies. I found a photo from last year of two pretty valentine towels I made. And I also used that same design to make valentine coasters this year. Almost forgot...I made two dresses for American Girl Dolls for the oldest two granddaughters. 

 Here are the photos:


Monday, September 2, 2013

Ikea Knodd Bin

The Knodd Bin (4 gallon size can) from Ikea is the perfect container for the nursery, for holding cloth diapers that are accumulating for the laundry. 

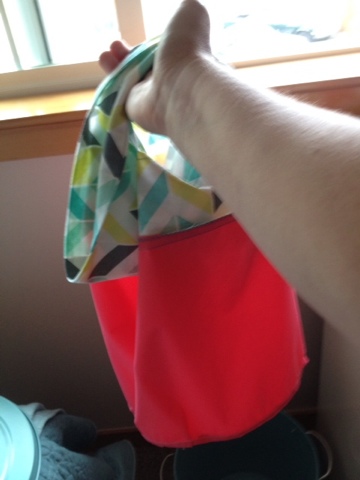
My daughter and I devised a liner, made with PUL fabric, which goes into the can and serves to hold the diapers, keeping them from actually touching the can itself, therefore keeping it clean. When it is time to do the laundry, the liner can simply be lifted out of the can, the contents dumped into the washer, and the liner itself thrown in to be laundered as well. 

Here is a photo of the can with the finished liner in it:

And here is the inside of the can, where you can see the pink PUL fabric, which is the waterproof material:


DIRECTIONS

1) Trace the lid of the can onto a single layer of the PUL fabric (this will be the piece that is used for the bottom of the liner.)


2) For the main tube, cut a piece of PUL that is 42 1/4" x 9 1/2". Sew a 1/4" seam down the short side. I found it easier to put the shiny sides together, as the fabric feeds through the machine without a problem.

3) Next, pin the shiny side of the circle to the shiny side of the tube and stitch all the way around as shown below. (try to keep the seam around 1/4" to 1/2" .... you don't have to be perfect.) Set aside this piece while you proceed to making the band for the liner.

Lisa is holding up the liner, in the manner that it will be inserted into the can. The seams will be against the can when inserted. The diapers will rest against the shiny "finished" surfaces of the liner:


4) The band can be made out of most any cotton or cotton/poly fabric. We selected a fabric that went well with the turquoise bucket. Cut two pieces of band fabric, each measuring 42 1/4" x 8".


5) Fold one strip lengthwise, and press. Unfold this strip.  (the photo shows both strips pressed down the middle, but it is only necessary to press one strip; all you are doing is creating a line to follow when stitching.)


6) Place the strips right sides together. With your fold line on top, place pins at the following measurements....
7", 14" 28", and 35". Start at the edge of the fabric and stitch on the folded guide to the first pin. Be sure to backtack at the beginning and end of each segment of stitching. Then leave a gap of 7". Start stitching again at the next pin which is the 14" mark; End stitching at the next pin which is the 28" mark. Once again, leave a 7" gap and start stitching at the next pin which is the 35" mark and stitch to the end. (The photo shows the fabric strips on top of each other, right sides together, and the pins placed as indicated above. You will be sewing right on top of that fold line, stopping and starting as indicated above.)


7) Now you will "open up the fabric, folding each piece back upon itself. Press. The photo shows that you will have created a band with two openings that will serve as the slots that slip over the handles of the can.


8) Now, just stitch around the openings for further reinforcement. This step is not necessary, but does finish them off nicely.


9)Press under 1/2" on both long edges of just one side of the band. These folded edges will be stitched together, forming a finished "hem" on the portion of the band which hangs over to the outside of the can. Stitch them together.


10) Stitch the short edge of the band together to form a tube shape.


11) Pin the band to the PUL piece you had previously set aside. You will be pinning the band to the shiny side of the PUL. And, be sure that the band seam is not against the shiny side. See photo. Once this seam is sewn, and the liner is inserted into the can, you will be flipping the band to the outside and the band seam will be hidden underneath the band.


12) Zig zag the seam you just sewed. This will prevent long threads from pulling out in the wash. The photo shows the zig zag stitching...the PUL is on the underneath side, but I have flipped it forward to show the stitching as it doesn't show up real well on the band fabric. (Note: the non-shiny side of the PUL does feed well through the machine).


13) Insert finished liner into can, slipping the slots of the band over the handles!


liner bag being lifted out of the can:


Thursday, February 9, 2012

Rosie Posie Birthday Cards

I really like the Rosie Posie stamp and die set from PTI. These cards were cased from a similar one designed by Maile Belles. 


Monday, January 23, 2012

Christmas Notebooks

These little notebooks are so quick and fun to make. I had some K&Co. Christmas doo-dads that added a nice dimensional touch. The cardstock is SU Pear Pizzaz. The rhinestones are Recollections from Michaels. Most everything else is PTI...the patterned paper, the swirl stamps and the tag die. The notebooks that are glued inside the cover are also from PTI. Now that I think of it, the swirl stamps would have been nice to include on the notebooks themselves, just like I did on the tags! Next time! These made fun little gifts.

Sunday, January 22, 2012

Beauty Shop Towel

My sister needed a gift for her beautician, and we found this design of a blow dryer and scissors on Embroidery Library's site. The font for the name is Noodlescript. I aligned the name with the end of the dryer cord which I think looks pretty cool!